
GuideHow to digitise paper records
This practical UK guide shows how to digitise paper records without losing anything on the way: what to count, what to keep, how to prepare and scan it, how to make it findable, how to check the work and what to do with the paper afterwards.
Eight steps from filing cabinet to searchable records
Scanning is the visible part of a digitisation project, but most of the success is decided before the first page goes through a scanner, and in the checks afterwards.
Day-forward or back-file: decide your approach
There are two kinds of digitisation, and most organisations need both at different times.
| Day-forward scanning | Back-file scanning | |
|---|---|---|
| What it covers | New paper as it arrives: post, forms, signed documents | Existing archives: boxes, cabinets, offsite storage |
| Main benefit | No new paper files are created from today | Space freed, records findable, storage costs reduced |
| Usual pattern | Small batches every day, often with data captured for a process | A project with a start and an end, box by box |
| Indexing | Often rich: the data drives the next step | Often lighter: enough to find the file |
| Main risk | Delays if scanning becomes a bottleneck | Cost and effort spent on records that should have been destroyed |
A common plan is to start day-forward first, so the pile stops growing, then work back through the archive in order of how often files are requested. Some files may never be worth scanning at all; a "scan on demand" service, where a box is retrieved and scanned only when someone asks for it, can cover them.
Take an inventory
Before you can plan, cost or schedule anything, you need to know what you have. You do not need to look at every page, but you do need a reliable picture of every box or cabinet.
- Where it is: site, room, cabinet, offsite store and box reference
- What it is: record series, such as personnel files, customer files, invoices or minutes
- Date range: the oldest and newest records in each box
- Physical state: staples, bindings, folded or fragile pages, oversize plans, carbon copies, photos
- How much: an estimate of boxes and sheets, from a sample of typical boxes
- Sensitivity: whether the records hold personal, financial or health information
- Who owns it: the person who can decide what happens to each series
Give every box a unique barcode label at this stage. It makes tracking, reconciliation and later retrieval far easier than relying on handwritten box numbers.
Review retention before you scan
The cheapest page to scan is the one you are allowed to destroy. Before scanning, check each record series against your retention schedule. If you do not have one, this is the moment to agree one with the people responsible for legal, HR, finance and data protection.
For each series, decide:
- Whether it has passed its retention period and can be securely destroyed without scanning
- Whether it must be kept, and for how long after scanning
- Whether any records are under a legal hold, investigation or dispute and must not be touched
- Whether the original paper has to be kept for legal, contractual or regulatory reasons
Data protection law expects you not to keep personal data longer than you need it. A digitisation project is a good chance to put that right, and a well-run retention review is designed to help you meet those obligations. The rules differ by sector and record type, so take advice from your own legal adviser, regulator or professional body rather than relying on general periods you have seen elsewhere.
Prepare the paper
Preparation is the slowest part of most back-file projects, and the part that most affects scan quality. A scanner can only feed what has been made ready for it.
Remove fixings
Take out staples, paper clips, treasury tags and bindings. Repair torn pages and flatten folds.
Sort and order
Put pages in the order you want them in the digital file. Decide whether to keep the original order of a file or rearrange by document type.
Mark the boundaries
Insert separator sheets, barcode sheets or patch code sheets between documents and files, so software can split the stack automatically.
Deal with exceptions
Set aside oversize plans, photos, fragile pages and bound books for a different scanner, and put a slip sheet where each one belongs.
Log what you find
Note originals that must be returned, items that are damaged, and anything unexpected such as cheques, cash or very sensitive material.
Scan with the right settings
Agree the scan settings in writing before you start, test them on a sample of real boxes, and keep them the same for each record series. These are common starting points; your own tests decide.
| Setting | Common starting point | Why it matters |
|---|---|---|
| Resolution | 300 dpi for ordinary text documents; higher for small print, plans or photos | Too low and text recognition suffers; too high and files grow with little gain |
| Colour | Black and white or greyscale for plain text; colour where colour carries meaning | Stamps, signatures, highlighting and coloured forms can be lost in black and white |
| Duplex | Scan both sides, with blank pages removed automatically | Avoids missing writing on the back of a page |
| Output format | Searchable PDF, or PDF/A for long-term keeping; TIFF if your system expects it | The format must suit both today's system and future access |
| Image clean-up | Deskew, rotate, crop and despeckle | Cleaner images read better and are easier for people to view |
Watch each page as it is scanned so a jam, a fold or a double-feed is caught at once, rather than found weeks later when the paper has gone.
Index so people can find things
A scanned page that nobody can find is no better than a page in a box. Indexing means recording the few values people will search by, and naming and filing the output so it lands in the right place.
- Choose a small set of index fields per series: for example employee number, name and document type for personnel files, or account number and date for customer files.
- Check index values against a list of valid employees, customers or cases, so a typing mistake does not hide a file.
- Make the text searchable with OCR, so people can also search for words inside documents.
- Use consistent file and folder names built from index values, not free typing.
- Record where the paper went, so a file can always be traced back to its box.
Barcodes help here too. A barcode on a cover sheet can carry the file reference, so it is read rather than typed.
Check the quality
Quality checks are what let you trust the digital copy enough to stop using the paper. Build them into the process, not just the end of it.
- Automatic image checks for blank, skewed, blurred, dark or low-resolution pages
- Reconciliation: compare the number of sheets expected with the number of images produced, box by box
- Random sampling: a second person checks a sample of pages against a written checklist covering legibility, completeness, order and index values
- Rescans: a clear way to retrieve a box, rescan a page and replace it in the digital file
- A record of every check, who made it and the outcome
Keep the paper until each box has passed its checks. Once paper is destroyed, a missed page cannot be recovered.
Decide what happens to the paper
Once a box has been scanned and checked, there are usually three choices: return it to its owner or store, keep it for a set period and then destroy it, or destroy it securely straight away. The right answer depends on your retention review and on any requirement to keep originals.
- Get written authorisation from the record owner before anything is destroyed
- Use a secure destruction method suited to the sensitivity of the records
- Keep a certificate of destruction recording what was destroyed, when, how and by whom
- Keep a chain of custody from collection to disposal, so you can show where each box was at every stage
Whether a scanned copy can stand in for the original as evidence depends on the record type and how the scanning was done and controlled. If that matters to you, discuss it with your legal adviser and look at recognised standards for the evidential weight of electronic records before you destroy originals.
How DocView Capture supports a digitisation project
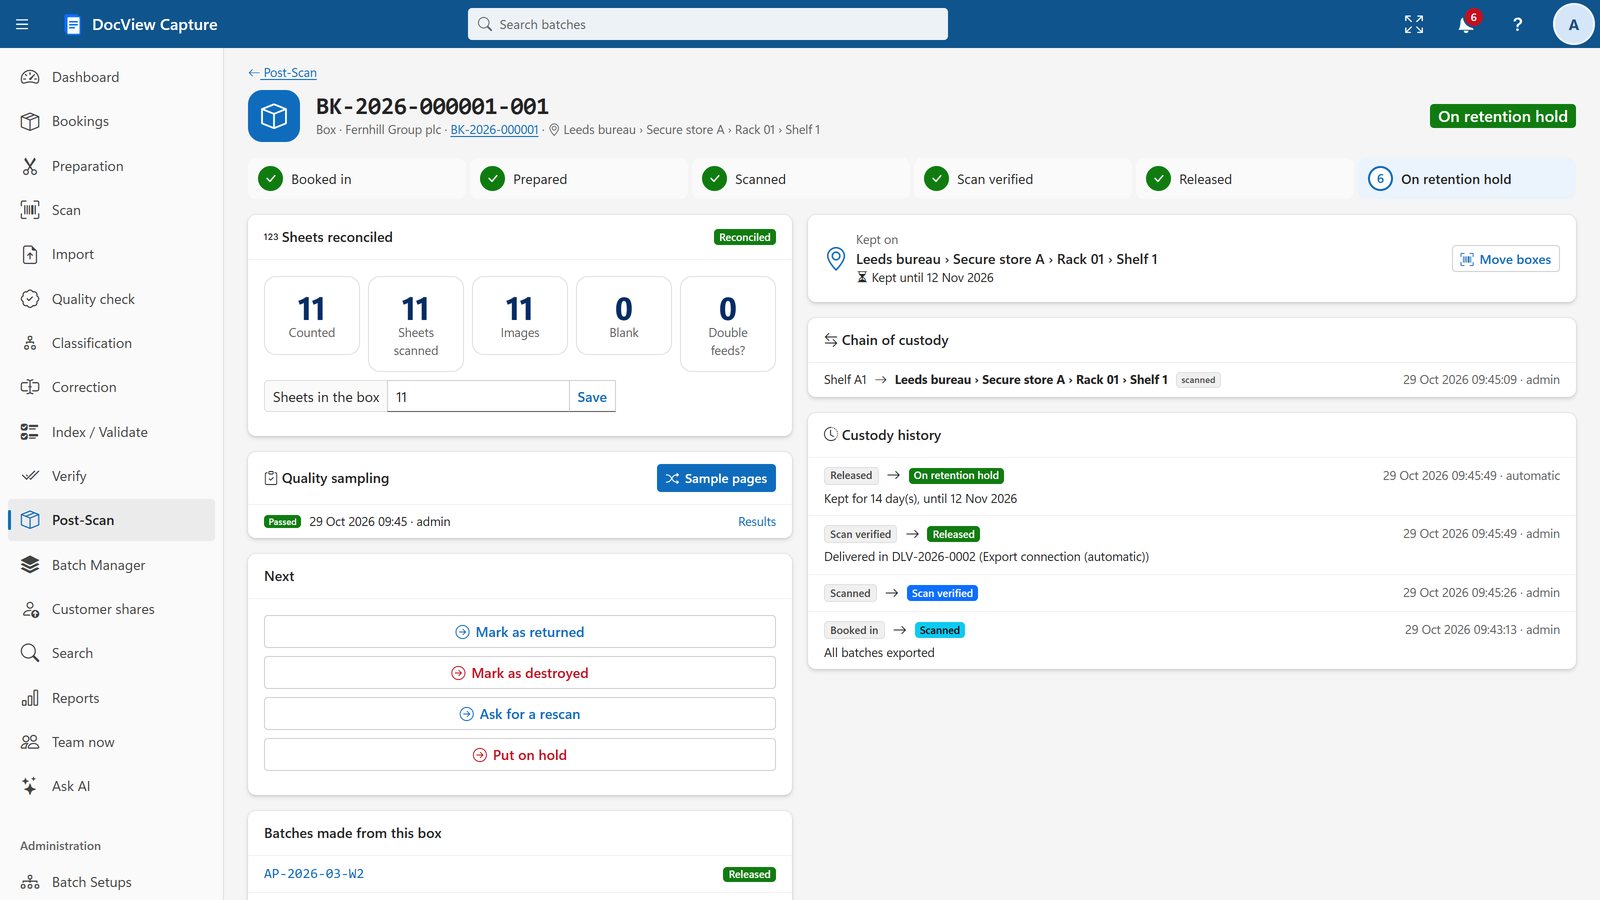
DocView Capture covers both day-forward and back-file work, from receiving boxes to the certificate of destruction.
- Receive deliveries by scanning each parcel, print box sheets, and prepare each box at a preparation station with a timer
- Scan from TWAIN or WIA scanners in the browser, with every page shown large as it is scanned
- Image clean-up profiles and an automatic check for blank, skewed, blurred, dark and low-resolution pages
- Split stacks by barcode, patch code, blank page or keyword, with slip sheets for oversize documents
- Scan reconciliation, random quality sampling and rescan requests
- Boxes tracked by site, zone, rack and shelf, with an append-only custody history
- Retention with customer authorisation and a numbered Certificate of Destruction
- Searchable PDF, PDF/A or TIFF, and one search over documents, index values and page text
See how this fits together for document archiving and back-scanning, employee file digitisation and scanning bureaus, or the digital mailroom for day-forward post.
Questions about digitising paper records
Should we scan everything in the archive?
Usually not. Review retention first and securely destroy what is no longer needed, then scan what is used often. Records that are rarely requested can stay in storage and be scanned on demand.
Can we destroy the paper after scanning?
Often yes, but it depends on the record type and on any requirement to keep originals. Check each record series with your legal adviser or regulator, get the owner's written authorisation and keep a certificate of destruction.
What file format should we use?
Searchable PDF is the most common choice because the text can be searched. PDF/A is designed for long-term keeping. TIFF is still used by some document systems. Choose what your target system accepts and what you will be able to open in future.
Should we do it ourselves or use a scanning bureau?
Day-forward scanning is often done in-house, close to where post arrives. Large back-file projects are often given to a bureau with production scanners and trained preparation staff. Either way, agree the specification, indexing and quality checks in writing first.
Plan your digitisation project
Try DocView Capture free for 14 days in your own workspace, or talk to us about a 30-day installed evaluation.